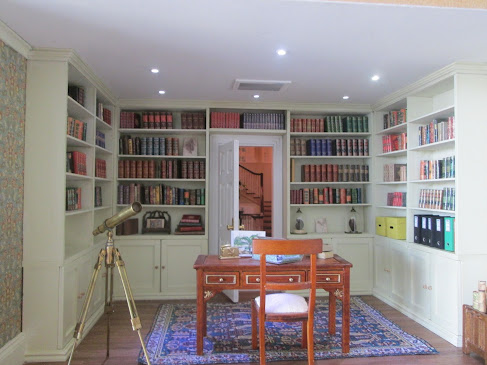
This was the very nearly finished library in Dalton House before it moved on.
I ripped it out in hopes of re-using it for a room box. Sadly there was a lot of damage. Three back panels split and the cornice trims around the top took a beating. There were bits and bobs of other splintering and, of course several sides and all the shelves fell out.
I had already experienced a similar event with the two kitchens I thought I could retrieve and reconfigure into anther room box kitchen. I quickly discovered that was not going to work and have ordered a completely new flat pack from Elf. With that in mind I almost immediately gave up on this room and would have binned them; luckily I dashed off to make dinner and that was it for that day. The following day, with closer inspection and fresh eyes, I could see possibilities.
Let me just say, by now I had a spread out heap of assorted broken and unbroken pieces. The first task was to try and properly assess the damage by roughly sorting into a right hand set of bookcases and a left hand set. It was a heck of a 3D jigsaw puzzle. The pictures you see here were taken some time later and have quite a bit of re-assembly in them so they don't look too bad.
Having done this I could see that if I can get things to glue back together successfully and be able to get some more trim from Elf and be able to match the paint, I might be on to a winner. Any repairs, with luck, will be well hidden by books and boxes. 🙏 There are a lot of ifs, buts and maybes going on there.
The lesson to be learned from this little epistle is: if you ever intend to dismantle anything for re-use, taken a gazillion detailed 'before' photos of how it was and as you dismantle put the pieces down in a logical order.


I remember dismantling the barn and cannabis shops a few years ago and thinking maybe I was an even better gluer than I'd thought! It's no small task to remove things for repurposing, but from the photos, it looks like you're doing an amazing job of it! I love the idea of taking photos along the way to help make sense of it later on. Godspeed with the rest of it, and I hope there is lots of fun in the mix of the chaos, too!
ReplyDeleteI had exactly the same thought. I am always concerned something isn't sturdy enough but clearly my gluing technique would take some beating. I often add the tiniest spots of super glue gel here and there amongst the wood glue just to give it instant grip while the wood glue sets up so this belt and braces approach didn't help. The wood flooring is always put down with double sided sticky tape because I always wanted to be able to lift it if there was any problem with the wiring or wanting to change any lights. Very funny. It seems double sided sticky tape turns into a very effective glue over time, the floors came out in many sticky bits. Luckily I didn't want the floors… though it would have saved me a bunch of money; I just wanted the lights.
DeleteHi Marilyn!
ReplyDeleteI had a bit of catching up to do with some of your back posts to enable me to make sense of this one, but now I understand. I've notoriously gutted almost all of my dollhouses from the 80's and 90's to reuse some of their fittings in newer builds so I get what your doing, however, it's always a bit of a shock when you are watching someone else do it!
I clearly remember when you built your library for Dalton House and how impressed I was not only with the precise measuring and fittings of the shelves, but also your faux hall as seen through the door- all so beautifully made.
Even so, I LOVE how you are planning to repurpose the shelving for your bookshelf roomboxes so reduce, reuse, recycle with nothing wasted and A WHOLE LOT gained!
elizabeth
Apologies Elizabeth, just found this. As always you bring a nice upbeat note to all my grumping which gives me hope for a possibly OK result. Thank you.
Delete