Saturday, 25 September 2021

Library - paint for shelves

 Sadly, when I went through my stuff - moving everything to another rejig of my work area - I discovered that most of the paint and glue had not survived their three years holiday.  I was particularly concerned about finding a match to the already painted shelves for the library.  They needed touch ups and the new trim for the top edges needed painting.  My memory of doing Dalton House was that I mixed several paints or at least let down the colour with some white every time I painted a wall or piece of furniture, so the paint for my shelves could, quite literally, be totally unique.

One paint which had survived the stash was a tester Dulux called Melon Sorbet.  The name seemed very familiar so I whooped with the expectation that was the one I used.

I tested a little on a hidden section of the shelving and even let it down with some white but it clearly wasn't in the same family at all.


The brain is a totally weird thing for sure - days later and for no particular reason I decided the paint had been one from The Little Greene Paint Company and called Eu de Nil.  These are super nice quality paints.  £4 a sample tin but no postage and a good size.  

As it turned out getting this sample proved ridiculous - I ordered it, it never arrived, I chased it up, two emails not answered, I phoned them - said they would UPS a replacement that day - that never turned up either,  another phone call and another UPS replacement promise.  Fortunately that one arrived.  It took a month from order to arrival!

Having said all that, I don't want to deter anyone in the UK who might be looking for lovely quality paint in a nice quantity for your projects.  My previous experiences with them have all been excellent.  

Elf had sent me a trim for the front edges - sadly they had run out of the one I had originally.  after much deliberation I decided against it.  The previous top trim had served two purposes - trimming the edge and making the shelves reach the ceiling.  These shelves of course had been made by Elf to fit the dimensions of that room.

the library being built in Dalton House, showing ceiling height shelves


These room boxes are taller so that wasn't going to happen and the new trim was a bit 'fancy', so I decided to just sand the front edges and touch up along with the dints.

The dents along the sides were from using a screwdriver to lever out the shelves which I had judiciously super-glued to the library wall in Dalton House - they would never need moving!!  They positively screamed damage when set against the side walls.


I am really not good at filler of any kind.  Having tried on real house walls many times over the years and pretty much left them looking as bad as they did pre-filling, just a different 'bad',  I decided there was no reason to fiddle about with it as I probably wouldn't succeed whatever I did.  It was a case of stick a blob on every dent and then sand down best I could.
.

the front edges were sanded smooth from where the trim had been ripped off (right photo).  When painted they came up OK (left photo).


After sanding and painting even the sides looked presentable.


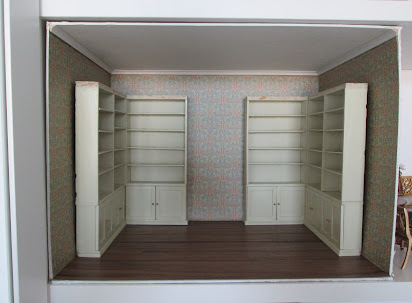
How lovely to have straight walls to work with.  This is just a dry fit.  I am now off to do the usual routine of paint and paper and trim and 'electrocute a box until it becomes the library.  At least there are no more chimney breasts to do.


Saturday, 18 September 2021

Hiatus


 This week's post will be a non-event I'm afraid as I am in a bit of a hiatus.  I am trying two places to source the wood for my boxes.  More accurately trying to get two places to cut the wood for me.  As always my emails and queries are out there and nothing (sensible) coming back so far.

Maybe I can share a couple of fabulous purchases with you.

Firsty a teeny box from the breathtakingly perfect Mini Fanaberia .  I always find it an extra joy when you receive a beautifully packed little parcel, not to mention a cute little surprise gift enclosed


I have made a gazillion books but I thought I would like to treat myself to some really lovely, perfectly in scale ,cookery books from here.  I have measured heights and widths and they are spot on, so will all fit nicely on a one inch deep book shelf in my future kitchen.


They all contain pages and all have a perfectly printed spines so they can be stacked and read from that angle too.


The very next day after receiving these I got my meg-major purchase for this new adventure.......the flat pack kitchen from Elf Miniatures  I am sure these following photos are pretty meaningless to you but as these blogs are my diaries of a particular build I like to record almost every little detail.

In the case of the kitchen arriving from Elf, it is far from a little detail.  Other than the boxes themselves, this will be my major purchase for this project and also the major piece of intricate construction I will be doing.  Also, in truth, it is nice to register the moment of pleasure on opening my Elf delivery.

Ta dah! .... one flat pack kitchen


The next photo shows the pre-built cooker hood.  You can get this in kit form.  

The underneath stiffish card in the photo is subway tiling.  

The two rolls are plastic film. The large white one is for covering the cupboards - though I am still considering painting them again as I always do.  The smaller grey roll is for the 'granite' worktop.   Sadly the chap who used to cut the fabulous Decrastone worktops and hearths and floor tiles which I have used over the years, has retired.  There is a chance a member of the family may continue the business but it will be a while getting set up and me, being me, always wants to just crack on.

The ceramic cooker top is simple but looks really effective when in place.


The next photo is is also in the meaningless-to-you vein (probably). 

On the left are the components for a butlers sink - a cupboard, sink, pop up waste and tap.  

In the centre are all the pieces for a double oven and cupboard.  I haven't done one of those before

On the right is a bag of bar handles to be used on drawers and the dishwasher, and knobs for the cupboards - haven't mixed them before so I am not sure if I will like that.  There is a total of total of twenty-eight handles and knobs so that gives you some idea of the challenge ahead.


The next photo is the one which strikes terror in my heart - the box of a gazillion trillion pieces of cupboards.  I have spotted the glass shelves for four cupboards and the lighting for those.  Mmmmm ...... a mini challenge there then.  

Opening the box is always the moment of joy and regret.  The joy comes from looking forward to having made it and the huge regret is that I ever decided it was a good idea.


This is probably the largest Elf kitchen I have done but, cumulatively, I have done many.  Every single project has had Elf in it.  Some builds, like Chocolat, depended a lot on Elizabeth's kits. 

I love the painted finish, especially when replicating Ikea items, but it takes a great deal of patience.  Ideally it needs about six coats, rubbed down between each one.  Realistically, at least three careful coats with interim sanding and it is all done before construction so you are working on very many tiny elements for quite a long time.  That should make for interesting reading, not.  

Well OK, I'll take deep breath and put it away, this is a project to be tackled a good deal further down the line.

Saturday, 11 September 2021

Boxes - trims/coving


While I was prepping the floor and doing the wallpapering I used the various waiting times to paint the coving.  First a coat of the same paint as I used on the ceiling, let it dry, then gentle sanding with very fine sanding sponge.  Then apply a second coat followed again by a light 'buff' with the sanding sponge.


To cut the trims I use a mitre block and G-clamp it to the table


.....  and cut with a razor saw.  You can get both of these pieces of kit in a set from various dollhouse suppliers.


Take your piece of coving and make your first 45 degree cut.  There is no simple way to describe how you work out which way that will be on your coving,  Do your best to visualise it and mark the direction with a pencil - you won't use that as a cutting line it is just a reminder of the way you want the cut to go when you take the wood to the mitre box.  After you have figured out a few it does become easier.  (If you want detailed help got to my Dalton House blog and click on the link in the margin labelled trims)  


Always start at the back of the room.  

I find that measuring the space very accurately is difficult; rulers don't fit conveniently and tape measures have some slack on them and are fiddly to use.  The easiest and most accurate way is to get some scrap paper longer than the space, crease a very sharp edge on one side and put in place snugly against a side wall, smooth across to the other side and use you finger nail to mark the crease where the two walls join.


Transfer that measurement to your coving strip and mark up on both faces so you can see the mark when it is in the mitre.  This mark is the point where your next forty five degree cut starts.  Make your second cut and it should fit perfectly.  


Glue in place. 

The two side strips are easier, you need to cut a corresponding angle and slide the piece in place and then mark off where the front of the box comes.  That becomes a simple ninety degree straight cut.

Glue in place.

At this point I am bordering on tearful.  Thanks to my old friend Mr Cardboard  this is where I discover that walls and ceiling do not make a lovely neat sharp right angle join so..... I can either glue the trim to the ceiling or to the wall but not to both!  I settle on gluing the coving to the ceiling and try really, really hard to disregard the gap where the wall is.


I pride myself on working to a fine tolerance and am proud of my coving and skirting and other trims all meeting spot on and finishing off joins beautifully, like this trim in the hall of Dalton House.


I now have to decide on 

  • whether to cut my losses and abandon the whole project
  • how to cut wood to make wooden boxes
  • seeing if I can get them made
  • carrying on with this one now I have got this far and see if I can just tolerate it as a sort of background to the actual things I want to display.
- - - - - - - - - - - - - - - - - - - - - - - - - - -

PS:  a couple of days later ......

Huge apologies I have just wasted a chunk of your life, unless you wanted a demo on not using cardboard for making room boxes.

After trims and floors were dry I took a dry run with the bookcases.  This showed me just how much the side walls were bowed.


I appreciate that this wouldn't matter so much on a room that just has normal freestanding furniture in it but in a room that requires bookshelves to go against a wall it just won't do for me.  Also one of my boxes will be a fully fitted kitchen and there is no way I can fit a kitchen against wavy walls.

I am upset on many levels.  As well as some hours of careful work lost I have also lost the wallpaper, flooring and trims.  The wallpaper was all I had left from the original Chinoiserie order.  I have just bought a couple of other papers from them again and it cost an arm and leg in postage as well as being quite pricey paper.  Ditto with the flooring from another supplier.  Even more exasperating are the three trims.  When I was ordering the things I needed for these six boxes I worked on lists for days to try and consolidate as many items as I could get from the least number of suppliers (postage saved) and then discovered I had forgotten these three pieces of simple coving.  I think the postage cost more than the trim and now I have to do that again.

Hey ho, do I delete these posts and just start this blog again or leave them to show things you might want to ask yourself if using cardboard?

Meanwhile I may have found a source to cut me some 6mm medite (moisture resistant mdf).   I have sent them a bunch of questions and hope to have an answer soon.

Saturday, 4 September 2021

Boxes - Flooring

 Hopefully this will be a very short and simple 'how I do floors' post.

I have always used this lovely real wood flooring - used be under a Houseworks label but as you can see here this seems to be just a generic .'made in China'  label.  The floorboards are in perfect scale for many historical periods and the walnut colour is lovely against traditional furniture.


I have always used a B & Q quick dry satin varnish (water clean up) but it seems to have changed its form and the new version gets pretty rubbish reviews so I switched to this one It was cheaper too, so far so good.


Luckily as I have done this for years there was no panic when the whole thing decided to curl up after the first coat.  I usually leave overnight to dry and then weigh down the next day until I am ready for second coating, then repeat.


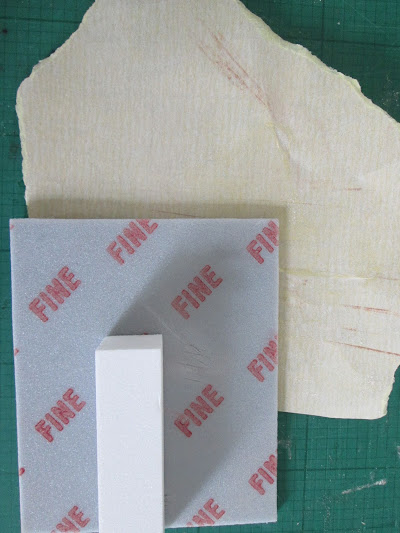
For finishing a painted or varnished surface you need the absolute finest sanding material you can find.  Here's three of mine - a four hundred sandpaper, a painter or plasterers sponge, nail 'buffer'.  Any one of these will do the job.  I favour the painters/plasterers sponge.


After light sanding and its second coat and flattening process it should have been a simple matter of using double sided sticky tape to put the floor in the box as I have always done with my shops and houses.  Cardboard strikes again.

It proved impossible to remove the protective 'paper' from the tape. Once it was stuck down the cardboard sucked it up and there was no leeway to pick off the top layer to reveal the other glue side.  All that happened time and again was the whole tape came up. glue and all.  Never mind, thinks I, I will try the magic spray glue that I had just bought.  Never made the slightest difference.  I would like to think that it was the waxy backing on the wood flooring that was the problem here but I am seriously concerned about using this glue for the wallpaper as planned  because I couldn't discern a glimmer of tackiness where it went down.

Third and finally, out came good old UHU.  So far so good.


I really wouldn't recommend porous cardboard of any kind for room boxes for sure.  

I am about to investigate what kit we would need to hire to cut thin MDF into perfectly rectangular pieces of wood.  Would gluing them together be enough?  The house kits I have used are usually grooved to take the walls and keep them square to the base etc.  Much trawling the web tonight, methinks